So you’ve got a hangboard-now what? There’s LOADS of information, opinions and ideas on how to use a hangboard, with all sorts of structured programs, workouts and magic exercises that may claim to be a fast track to becoming monstrously strong… but what’s going on with your body when you hangboard? Let’s jump in, and look at some of the science of hangboarding, and why exactly it can help your climbing so much.
I say “some of the science” for a reason. Realistically, climbing is intricate! There are so many factors as to what makes a climber, all of which can be targeted and trained. Whether it be the physical aspect of climbing, the technical aspect or the mental aspect - climbing is a broad and complex sport that has many different roads to improvement based on the individual’s ability, training experience and tolerance.
As fantastic as it would be to have a magic ‘get strong quick’ program that suits every climber out there, nothing beats having a coach stand there with you and tailor everything to your needs. That can be tough at present (though not impossible) whilst gyms are shut and we’re all at home - so unless you’ve got a woody, that’s where the hangboard comes in.
Hangboarding - or fingerboarding - aims to simulate what your fingers would be doing when you’re climbing, and with progressive overload, gives your body the stimulus needed to adapt to stresses and ultimately get stronger.
Though hangboarding might not encompass all facets of climbing, and though it might not provide the same mental or physical stimulus as moving on a wall; you’ll still get physically stronger. Ultimately, your forearms don’t know if you’re squeezing wood, plastic or rock.
Anyone can hang randomly on a hangboard until they’re “tired”, and honestly if you’re brand new to training that may be where you start! Depending on someone’s training experience, gains are possible with differing levels of effort, based on the individual. Regardless, to train in the most effective manner we can, a little bit of structure can make all the difference - especially when the goal is to improve, rather than just maintain.
To know the intensity needed during your hangboard workouts, you’ll need to complete a testing session to find your baseline. There are a multitude of testing methods out there, and they’re all good so long as you use the same method to test each time.
What you’re aiming to figure out is your maximal loading. To do this, you’re aiming to hang off of a 20mm edge (or similar) in a half crimp position (4 fingers, no thumb) with the most weight you can, for 7 seconds. (If you’d rather hang in an open hand grip, go for it! You could even test for both.).
Whether you add weight, subtract weight (by attaching weight through a pulley to your harness as a counterbalance), or end up with just bodyweight to make the 7-second pass, that’s fine. The idea here is to find the benchmark to improve on! Later, when you re-test, make sure you use the same method and same edge you did your initial test on, and you’ll be able to see your progression.
Your testing session should be completed after a full rest day, with good skin while being well fuelled (fed) and hydrated. Ensure you do a proper warm-up first! Get your heart rate up a bit with something like star jumps or burpees, then limber up those fingers - rolling them back and forth through the full range of motion.
Warm-up your fingers and get the connective tissue lubricated by hanging on a bar, or larger holds for short pulls around 3-5 seconds, without getting pumped - with your feet still on the floor if you need. The last thing you want to do is hurt your fingers in isolation! If you’re still rugged up in a beanie and a jumper when you start your testing or hangboard workout, you’re definitely not warm enough yet.
When it comes to your actual max hang test, there are a few things to keep in mind:
7-second pass.
Add/subtract weight gradually between sets.
3-minute rest between sets.
No more than 8 sets! If you don’t find your max, try again at least 24 hours later when you’re no longer fatigued.
How you add weight is up to you. Generally in the gym, we’d add weight plates to a harness, or use a force place to measure output - though anything can work at home. A bucket of cement, a bag of potatoes in a backpack, tins of paint - anything goes. When it comes to removing weight, you’ll need to get creative with pulleys. You can use resistance bands to take the weight off, just bear in mind that it won’t be as measurable.
If you don’t have any weights or the means to do a testing session like this, it’s not the end of the world. Have a crack at a basic 7:3 repeater workout (written out below) with your body weight, and adjust the hold size based on how the whole workout feels.
Once you find the max weight you can add, you can figure out your maximal loading as below:
Maximal Loading = Body Weight + Max Added Weight
To find your maximal loading as a percentage of body weight:
Maximal Load as Body Weight Percentage = (Maximal Loading / Body Weight) x 100
E.g. If Frank weighs 72kg, and adds 70kg to his harness for a 7-second hang, his maximal load would be 142kg. As a percentage of body weight, Frank’s max load would be (142/72)*100 = 197%.
Frank is strong.
Most training protocols run off altering the effort based on your max load as a percentage of body weight. When you alter the effort and intensity of these systems, they affect which bodily functions and energy systems are used. So, let’s open that can of worms!

When you train on a hangboard you’re stressing the parts of the body being trained, and your body adapts to those stresses and alters its anatomy, becoming stronger and more robust in the long run.
The change occurs in your level of muscular recruitment and the strength and robustness of the connective tissue (think, pulleys and tendons), as well as in the blood supply to and from the working area. In addition to those physical adaptations, the type of training you do (hangboarding or otherwise) works different parts of your body’s energy systems - which is what we’ll focus on mostly here - specifically in regards to the body parts used to hang (i.e. forearms).
Without going too much into high school science textbooks, here’s a breakdown of the body’s energy systems and why they matter so much for climbing.
Your muscles burn something called Adenosine Triphosphate (ATP) to power the cells. Since your muscles only readily store a small amount of ATP, your body continually re-synthesises it to keep moving. The human body makes use of 3 main energy pathways, or systems, to re-synthesise the ATP. The three energy systems all last for limited amounts of time before ‘handing over’ to the next system, and each can specifically be targeted and trained.
These systems and their time frames are:
The ATP-PC System (aka. The Alactic System or Phosphagen System).
0 to ~10 to ~15 seconds.
The Anaerobic System (aka. Lactic Acid System, Lactic System, Glycolytic System, or Anaerobic Glycolysis).
~15 seconds to ~120 seconds.
The Aerobic System (aka. Oxidative System, or Aerobic Glycolysis).
~120 seconds to ~ 90 minutes
Woah, big words - but don’t fret. Let’s break them down!
The ATP-PC system is the initial burst of power. The output at this point would be the highest, but only for a short time. Your body burns the ATP that’s already there then uses Phosphocreatine (PC or CPr) to replenish that initial ATP supply quickly. It’s a one-off supply of 10 to 15 seconds before a rest is needed, up to about 5 minutes. (Think, bouldering attempts).
After that first ~10 or so second burst, the body needs to start doing something else to replenish that ATP. This is the point at which the Lactic, or Anaerobic system comes into play. In short, the body breaks down carbohydrates, turning it from one thing into another without oxygen to eventually burn glucose. Only about 5% of the energy potential of the glucose is harnessed. However, it does happen quite quickly. What you get is a moderate amount of power produced for a moderate amount of time (with Lactate or Lactic Acid being the by-product). However, this is only a small dent in the amount of carbohydrate your muscles and liver can store, ready to be used. In order to utilise the rest of the available carbs, the next phase comes in;
The Oxidative or Aerobic system. As the name implies, this is where the body uses oxygen to break down carbohydrates (and some other things). Only a small amount of ATP is produced, which is why aerobic training is more often seen in endurance sports, and harder to train on a hangboard. However, the aerobic system is still a vital part of climbing, as it directly aids the lactic system, by aiding in lactate removal.
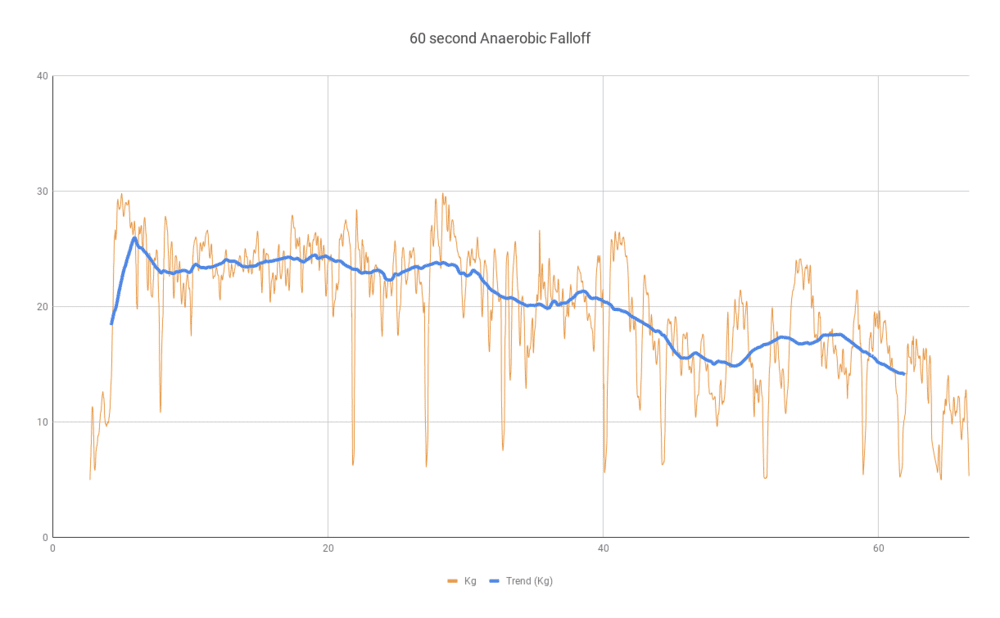
The above diagram is an example of a 60-second energy falloff, represented as Kg over seconds.
In this diagram, the example climber pulled on a 20mm edge as hard as possible, for 60 seconds. You can see the initial power output, then a slow degradation from the 20-second mark, before it continually started to decline. So, there is a smooth handover from ATP-PC to the Anaerobic System, which started to produce more and more Lactate and fatigue the climber as time progressed.
By understanding the energy systems, you can gain a better understanding of why certain training is done the way it is, and a better understanding of what it is that the training is developing.

Now that I’ve melted your brain, let’s look at what exactly we’re aiming to do! Keep in mind; we’re doing this all on a hangboard with the idea that it can easily be done at home.
All of these energy systems and functions have other ways of being trained, be it in the gym or on the wall - we’re just assuming all you’ve got right now is an edge!
Just as there are different energy systems, there are different workouts you can do on a hangboard to target different systems. The initial ATP-PC system can be trained by pushing close to your maximal loading, at 80% or 90% max hangs.
The anaerobic handover and falloff can be trained by doing longer hangs at lighter loads, such as 50-70% hangs.
The latter end of the curve could be trained by doing 40-50% repeaters and avoiding the pump, or by doing long-duration density hangs.
There are ten million different ways to hang on your board, but they all revolve around the same science. Hopefully, with an introduction into how it all works, you can see through the fluff and choose what works for you.
However, let’s start with a few primary workouts to get you started:
You’ll want to mix up the training between four finger half crimps, and 3 finger open hand hangs — NO full crimps. That’s non-negotiable.
Time: ~40 minutes (or 25 minutes for a basic-version)
Effort: ~50% of maximal load
Focus: Aerobic/Power Endurance (very latter end of the curve)
Hang for 7 seconds, off for 3 seconds—7 on, 3 off.
x12 repetitions of this create one set. (For the basic version, do 6 reps).
4:00 of rest between sets.
Total 6 sets.
Time: ~25 minutes
Effort: 70-80% of maximal load. If too easy or hard, adjust intensity up or down.
Focus: Power Endurance (ATP-PC to Anaerobic hangover section of the curve)
Hang for 7 seconds, off for 3 seconds.
x6 repetitions of this create one set.
3:00 of rest between sets.
Total 6 sets.
Time: ~15 minutes AFTER warm up.
Effort: 85-90% of maximal load. Warm-up properly first!
Focus: Strength (Initial part of the curve). That is if you warmed up.
Progressively build load on your fingers during your warm-up until you’re ready for a max hang session. DO NOT JUMP STRAIGHT INTO MAX HANGS.
Carefully load fingers and hang for 10 seconds. That’s a set!
2:00 rest between sets. Be strict on this - quality rest matters.
Total 6 sets.
If at all you can’t finish sets, drop the intensity. Too easy? Ramp it up! First with reps, then sets and lastly weight.
If any part of your finger, arm or shoulder begins to drop, put your feet down and reset. You can’t get stronger if you’re injured! Also, don’t be too proud to drop the weight. There could be many factors that could give you an ‘off day’, so learn some self-awareness and taper it to your needs. You’re not trying to go for a personal best every session, so don’t get too carried away.
Training protocols for any sport are often done in cycles with an increase in intensity, followed by a lighter week or “taper” session, before starting the cycle again. The purpose of this is to focus on the long term goal of progressive overload to stimulate adaptation, which happens with consistent training. One crazy hard session won’t do much good if it’s all you do for 3 or 4 weeks!
The aim is to re-test your max at the end of your cycle, so it’s a good idea to write everything down and keep a journal. Write your test results, write the weight values you used during hang workouts, what workout you did, how it felt, how you slept, what you ate - everything! Keep yourself accountable! Climbing Meta training journals are fantastic for this and can be found in our shop.
We’ve only scratched the surface with all this, though hopefully with this info you can get well on your way to keeping yourself and those fingers strong!
So get a hangboard. If you can’t - heck, improvise. Grab a slat from your bed frame and nail it to something! (Seriously though, bed slats are usually around 20mm).
